http://www.velbekomme.com/ (wonderfully easy to remember, nicht wahr?)
Hello dear readers! On the occasion of Christmas and my never really user friendly website address, I have finally decided to take the jump. From now on, you can follow my foodie ramblings on the address above.
The blog is keeping its delicious looks, but the new setup will allow me to make all kinds of wonderfulicious trimmings. Just you wait 'enry 'iggins, just you wait!
Anyway, thanks a lot to Blogger for a great two and a half years of impeccable service.
Se y'all on the webthing.
Tuesday 1 December 2009
Monday 30 November 2009
Happy Birthday Rolls

No, we're not celebrating the birthday of the roll, but with the roll. Big difference - I'm not crazy you know. Talking to my oven fresh cuties here is not my thang, even though they do have a lot of personality if I may say so. But if I were to talk to them, I'm sure they would say something in the line of "Thanks a lot b****! How would you like it if you had to spend 12 freaking minutes in a scorching hell hole?" Well, maybe that's why I don't talk to them. Anyway, this kind of roll is what most children have on their birthdays in Denmark, topped with melting butter and coupled with hot chocolate and whipped cream. And that's just the starter. The main course is a great sponge cake with icing and more whipped cream. If the parents are really naughty (or have a death wish) they OD the children with candy after that and whooptedo: 20 hyperactive kids with tummy aches.
Aaaanyway, these rolls are really yummy on their first day, so make sure you have plenty of them, while they're still velvety, warm and can serve as the perfect vehicle for softly yielding butter. And speaking of birthdays, this dough is also perfect for shaping one big dough-woman or man, baking and decorating it with icing sugar and the candy of your choice. Brings out the child in me every time.
Happy Birthday Rolls (makes about 12 depending on the size)
Recipe adapted from an oldschool cookbook on Bagværk in the "Menu" series from Lademann (1979).
- 3 decilitres of milk (any kind will do)
- 50 grams of fresh yeast
- 75 grams of butter, diced and almost room temperature
- 1 tsp. salt
- 1 tsp. sugar
- 1 tsp. cardamom, powdered (the rolls won't taste like cardamom, but it gives a great taste base)
- 500 grams of regular wheat flour
- 1 egg, beaten together for glazing
1) Heat the milk in a saucepan until it's lukewarm (30-35 degrees Celcius). Then crumble the yeast into it and stir until it has dissolved completely. Add the butter and stir until it has melted. Add salt, sugar and cardamom, stir for a while and then add the flour bit by bit. Knead the dough until it has a soft, even and stretchy texture. Leave it in a bowl covered with a tea towel for 30 mins or until it has risen to twice its size. Remember to leave it somewhere with room temperature.
2) Take the dough from the bowl and knead the air our of it. If you're kind of nazi about having evenly sized rolls as I am, you can weigh the dough and divide the grams by the amount of rolls you wish to end up with. Then pull out lumps of dough and check that each of them has the chosen weight.
3) When you're through with dividing and weighing it's time to shape the rolls. I like to start kneading each lump and then, to create the nice even round shape, I take the dough and pull at the outer sides and shove them towards the bottom and into the center of the roll. I hope that makes sense to you, because I can't seem to find a better way of explaining it. If you do it right, you should be stretching the outer sides smooth and tucking in the "ends" into the bottom centre.
4) Put each roll on a lined baking tray and leave them to raise for another 15 mins. under a tea towel. Turn the oven to 220 degrees Celcius while you are waiting.
5) Brush the surface of the risen rolls with a lightly beaten egg and put them in the middle of the oven for about 12 mins. Make sure they don't turn too dark so look at them every now and then. Leave them to cool for 5-10 mins. and serve while they're still a bit warm so the butter will melt softly into the bread. Yummmm!
Tuesday 24 November 2009
Pear Tart With a Lemon/Marzipan Filling

I love love looove making tarts. It's the most satisfying thing ever because they always end up looking so pretty and round and Mother Goosey. This one is a hybrid of two recipes with a twist of Heidi on top.
Pear Tart With a Lemon/Marzipan Filling
The tart shell is exactly the same as I used in the French Lemon Tart. Prepare the shell following that recipe, including pre-baking it. Then make the filling below, which is a recipe from a random marzipan manufacturer with an added twist inspired by Smitten Kitchen: A whole half lemon blended into the mixture to add a bit of tang to the rich flavour.
Lemon/Marzipan Filling
- 1/2 organic lemon with everything (apart from the seeds)
- 150 grams of marzipan, grated
- 100 grams of icing sugar
- 75 grams of butter, in small cubes
- 1 egg, beaten together
- 1/2 decilitre of cream
- 2 pears, sliced lengthwise
Set the oven to 200 degrees Celcius. Blend the lemon with its peel still on, add the sugar and mix well. Throw in the remaining ingredients (except for the pears) and remember to grate the marzipan and beat the egg in advance. Then pour the mixture into the partially pre-baked tart shell (see link to recipe above) and arrange the pear slices in the filling as you like. I am ashamed to admit that I used tinned pears for the picture above. It was purely bad habit and it wasn't quite as lovely as it would have been with a pear that had more texture and charater left in it. Anyway, put the tart just below the middle of the oven and let it bake for about 40 mins. Check it with a pin. The texture should be firm, but slightly sticky. Make sure you also check its colour towards the end as it can turn dark pretty quickly. If it turns brown early, you can always place at large piece of tin foil on top of it (don't tuck in the sides, just leave it loose) or try with another baking tray above the tart. Leave to cool for 20 mins and serve. Perfect for those long November afternoons.
Monday 2 November 2009
Danish Delights: Flødeboller

This is NOT a 10 minute treat. Not by a longshot. But oh my G does it hit the spot after 2-3 hours of messing about in the kitchen. While it may not be a beginner's recipe, it's not as hard as one might think. The only problem is the chocolate, but come on, when has chocolate ever really been a problem? Chocolate drippings everywhere just give you an extra excuse to taste the stuff as you go along.
Apart from the odd Swedish or German interpretations of the concept "flødebolle" (~ "cream roll" though no cream or rolls are involved), I believe they are mostly a Danish invention. At least I know we've been the ones taking it to a higher level during the last decade or so. Basically a flødebolle consist of three things: A waffle or marzipan base cut into circles, a filling made of whipped egg whites and sugar (a bit like Italian meringue) and a chocolate "cover". That's it. But when you buy them from chocolatiers in Copenhagen, e.g. A XOCO (the best place for innovative and immaculate chocolate in Denmark as far as I'm concerned - they call it chocolate gastronomy and that's pretty much what it is), you get so much more. The version I made was inspired by our recent visit to the probably most infamous 2 star Michelin restaurant here called noma. Their filling was raspberry flavoured and it really brought me to my knees. Let's get this party started:
Flødeboller (makes about 40 with a 4 cm diameter base)
Recipe adapted from a Mad&Vin ad
Meringue filling
- 3 (pasteurized) egg whites
- 20 grams sugar
- 1/2 vanilla pod
- 15 raspberries, mashed (you can choose to remove the seeds by pressing them through a sieve first)
-----------------
- 50 grams water
- 225 grams sugar
Base
- 150 grams marzipan
- 20 grams chopped almonds
Chocolate cover
- 200 grams very dark chocolate, e.g. Lindt 85% cocoa which has a very nice acidity
1) Mix the almonds with the marzipan and use a rolling pin to roll it out on a slightly floured surface until it is about 4 mm thick. Cut circles into the marzipan using a small glass with a diameter of about 4 cm. Place an oven rack on some baking paper (for the chocolate drippings) and then place the circles on the rack. The leftover bits can be re-rolled and cut into squares and filled in the same way, but use them as tasters for later.
2) Whip the egg whites in a metal or glass bowl (important because of the heat later on) and add the sugar as they begin to turn stiff. Keep whipping until the mixture is nice and fluffy. Set aside.
3) Boil a syrup in a saucepan using the water and sugar. Let it reach 117 degrees Celcius and at that exact point, take if from the heat and whip it into the egg whites with an electric mixer, making sure you pour as slowly and as closely to the inside of the bowl as possible so it DOES NOT hit the mixer in the bowl. Be careful as the bowl can turn quite hot from the syrup. Keep whipping until it has colled down. When all of the syrup has been mixed, add the mashed/de-seeded raspberries and mix it well. At the end the mixture should be shiny, slightly "bouncy" and you should be able to form little peaks with the tip of your mixer. If not, keep mixing for another while.
4) Pour some of the mixture into a piping bag with a round-holed tip, squeeze it gently and twist it to keep the mixture in place. And here starts the tricky part. Squeeze out a little of the meringue onto one of the marzipan bases. MAKE SURE you squeeze it out evenly, because otherwise you will have trouble covering it evenly with the chocolate afterwards. A trick I learned along the way (did I mention this was my first time?) was this:
- Place the tip of the piping bag on the middle of a marzipan circle.
- Hold it upright and squeeze out an even blob that goes almost to the edge of the base
- Stick the tip into the blob and squeeze some more, always lifting it slightly upwards as you go. This should result in layered "waves" of meringue that turn smaller as you reach the wanted height. Mine were about 7 cm tall. See above photo for details.
- When all of the bases have been topped with meringue, leave them to set for 30 mins.
5) After about 20 mins. melt the chocolate in a bain marie (water bath) and leave it to cool to a "finger-temperature". You can always try pouring it onto one of your testers and see if the meringue melts. If not, you're ready to go. If it is too cold, reheat it gently, otherwise it won't run down the sides and cover the meringue properly. When you're pretty confident the chocolate is just right, pour it over each meringue top using a cup. Leave them to set. This is were I still need some clarification from a chocolatier because how the hell does one get the chocolate to cover completely? Even with all my precautions the flødebolle on the picture top right was still one of the prettiest of the bunch and that says a lot. Luckily I'm going on a chocolate course tomorrow evening and I will try to ask the chocolatier about this, so I might have some answers for you soon. If not, they are still extremely delicious in the more "rustic" version. The combination of the sweet meringue, and the acidity of the chocolate and the raspberries can't possibly be ruined by shaky design only. Plus, the almonds render the base slightly crunchy which is very very nice. Now go on, be bold and try it out. The reward is huge and mouthwateringly addictive! The flødeboller must be kept in the refrigerator in an airtight container. They can keep for 2-3 days but then the sugar starts crystallizing on the inside and the raspberry juicy starts dripping slightly. Not bad tasting but definitely better when they're fresh.
Wednesday 28 October 2009
Crispyfied Home Fries

Finally I cracked the secret code, not of home made gold, no, but of home fries. Yes sir. After many years of slicing, dicing, boiling, frying, baking and deep frying potatoes with more or less the same flacid result (I like my fries to stay crispy, please) I cracked it. It was only a matter of combining two pieces of information that had been scattered in my brain for years:
1) Olive oil can't handle high temperatures but other oils can.
2) When you bake stuff in the right oil, that very stuff turns crispy.
Hence the following recipe for:
Oven Baked Crispy Fries (enough for two lovers of fries):
Ingredients:
- 8 regular sized potatoes
- 1/2 decilitre of rapeseed oil
- Salt, pepper and additional herbs of your own choice
1) Turn on the oven to 225 degrees Celcius.
2) Fill a saucepan about 1/3 with water and add a teaspoon of salt.
3) Slice the potatoes in long wedges.
4) Put the wedges into the boiling water and let them boil on for 10 mins.
5) Take them out of the water, dry them gently with a paper towel and leave them to cool down slightly on a lined baking tray (I used the reusable baking paper as seen on the picture - very recommendable!). 5-10 mins. in front of an open window should suffice.
6) Spread about half a decilitre of rapeseed oil on the potatoes and make sure they are all thoroughly smothered in it. I used the simple, cheap kind of rapeseed oil that comes in a plastic bottle because the taste isn't as pungent as in the organic, dark golden kind I use for salads. Sprinkle it with sea salt and pepper.
7) Put the baking tray in the middle of the oven and let it bake for 10-15 mins. before you take out the tray and turn the wedges over with cooking tweezers, your fingers or af fork to make sure they get an evenly baked surface. In my oven they turn brown faster on the side turning onto the tray, but that may differ. Return it to the oven and repeat until the potatoes are completely cooked, brown and kind of "bubbly" on all sides. Leave them to cool for five minutes.
8) Make your own seasoning to sprinkle on top. Here I crushed some cilantro/coriander seeds with extra sea salt and grated lemon zest. Very delicious with a simple crème fraiche or Greek yoghurt dip.
Sunday 25 October 2009
10 Minute Treat: Hot Espresso-Chocolate
Looking at other people's blogs can be very inspiring. If you want a new way to pamper your guests on a Friday night, the possibilities seem endless. But what most of us really need, are ways to get us through our busy lives without having to settle for bakery cakes or ye olde spaghetti bolognese five days a week. That's why I've decided to share some of my little everyday tricks that fill out the vast space in between my more demanding kitchen projects. Here's the first one in a series of quick and easy ways of putting your inner snack beast to rest. This is one of my favourites: Hot Espresso Chocolate:
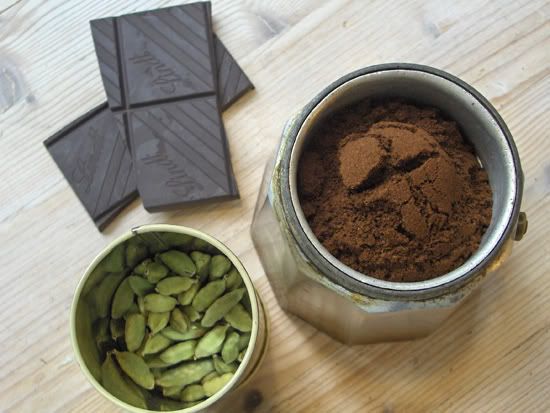
All you need is:
- 2 espresso shots/small cups of strong coffee
- 2 cardamom capsules (optional)
- 2 decilitres of milk
- A splash of cream (optional)
- 40 grams of dark chocolate
- 1/2 teaspoon of vanilla sugar (optional)
- A pinch of salt
1) Make two espresso shots using an espresso jug as seen above or here. If you don't have any such thing, I suspect a strong cup of fresh coffee or maybe even Nescafé could do the trick. I use two tablespoons of espresso for two decilitres of water. Throw in two slightly squeezed cardamom capsules (as pictured in the tin on the left) with the coffee (or in the coffee grinder if you have one) and make the espresso.
2) While the coffee is boiling pour two decilitres of milk (add a tiny splash of cream for that extra feeling of luxury) into a saucepan, add a pinch of salt, the vanilla sugar and heat it slowly. Meanwhile chop up the chocolate and add it to the milk when it has started building tiny creamy bubbles at the edges of the saucepan. Stir it until the chocolate has dissolved completely but don't let it boil.
3) Pour the fresh coffee into a nice cup. Whisk or froth up the hot chocolate (I use my Bodum French press but a regular whisk will do too) and pour it into the coffee.
4) Serve the drink and enjoy the instant comfort og two pleasures in one: Espresso and hot chocolate. If you're feeling adventurous I can recommend adding a touch of chili to the chocolate. That really takes it to the next level. But still, it shouldn't take you more than 10 minutes to make this:
Saturday 24 October 2009
Julie & Julia

(Our real life movie tickets, yup. Just so you know, I was in seat no. 7.)
Contrary to popular belief, I do, on occasion venture out of my kitchen. So last Sunday, I and my flour-dusted hair took T to the local movie theatre. Luckily we went to see Julie & Julia starring Meryl Streep and Amy Adams. The two main characters Julie and Julia discover the eternal truth that cooking is the most rewarding pastime ever. Though I'm not a weeping fan, I think Streep was really great in the role of Julia Child, the saga queen of the cooking revolution in post war America and author of the cooking bible "Mastering the Art of French Cooking". Not that I knew her before I saw this movie, but she was a real character and it seems that Streep really nailed her, so to speak. There might just be an Oscar in it for her. As for Amy Adams, she plays a young blogger in post-9/11 New York who decides to cook her way through said bible in just one year. It was very eery that Hollywood had managed to churn out something that I could actually relate to to that extent. I mean, a woman around thirty starts a blog with the help of her lovely husband, writes about cooking and experiences its therapeutic forces on a daily basis. Hello! That's me! Only hang up I have was the very very annoying way Amy Adams' character Julie's husband chewed his food. I just couldn't watch it. His mouth was all over the place. I'm sure it was just actor Chris Messina's way of portraying that elusive experience of drool and yum in a manner befitting the movies. But me did not like. Anyway, it's a real heart warmer and that's not something I would usually be caught dead saying (as if that makes any sense at all). What are you still doing here? Go catch it before it's gone like the butter on Julia Child's frying pan.
Subscribe to:
Posts (Atom)


